Welcome to the Photog Buzz

Follow along as Ryan shares the success and failures of a his start-up photography studio.
You just might get inspired!

Monday, November 30, 2009

Shooting in harsh sunlight

I was  visiting the in-laws in Florida for Thanksgiving so it has been a few days since I posted a blog.  I took all my camera gear and we took some family photos at my father-in-laws house.  I especially like this one of the grandkids.


Piling them all into a boat made for a great informal pose.  The sun was very bright and I have discovered that my personal favorite lighting in this situation is to have the sun directly behind the subjects so the sun doesn't cast shadows on their faces, and to lighten them up with a little fill flash.  I have tried having the sun behind me and I think it makes the light unflattering.  I have tried having the sun off to the side of my subjects, but have found the shadows to be too harsh even with some fill flash.

Keep shooting!

Ryan


Tuesday, November 24, 2009

Take control of your TTL flash photography

One of the toughest things for me to gain control of has been my TTL (through the lens) flash.  It always seemed to be hit or miss when it came to the right exposure.  It didn't matter what setting I used on my camera: program mode, apurture priority, manual...  The results always seemed to vary.  Sometimes the shots would turn out great, but a lot of times they didn't.

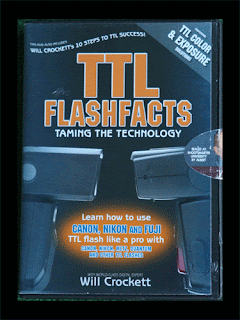
For today's blog I thought I'd let you in on a little secret.  Will Crocket's shootsmarter.com is listed as one of my "Top 10" photography sites and there is a good reason for that.  Shootsmarter.com provides a huge amount of free information that will make you a better photographer.  One of the items they have for sale that I would strongly recommend is their "TTL Flashfacts" video.  Here is what the copy I have looks like.


If you want to finally understand how to get the most out of yourTTL flash then check out this video.  I have watched it over and over and I am finally starting to understand this TTL stuff.  You may not have to watch it as many times as I have, but what can I say... I'm a little slow.

Keep shooting!

Ryan

Monday, November 23, 2009

Did You Forget the Fill-Flash?

Well, I made it to Florida and I'm hanging out with my wife's family this week, enjoying the warmer weather and looking forward to eating way too much this Thursday.  Last Friday I showed you this picture that I took of my brother when we were backpacking in Washington.


The camera exposed correctly for the background scenery.  The problem is that my brother looks like he's in the witness protection program.  I should have used fill-flash to correctly expose my brother and I am going to explain how you do that later this week.  But what can I say?  I screwed up this photo, so why not take this opportunity to show you how it can be salvaged using Photoshop and Lightroom. 

The dynamic range of the photo (the difference between the shadows and highlights) and the exposure on my brother was sooooo far off that image noise (grainyness) is going to be a huge problem.  If you look closely you can see Mnt. Rainier (I believe it was Mnt. Rainier) in the background.  Mnt. Rainier was over exposed to make matters worse.  I really like this photo though, so here is what I did to make it an image worth keeping. 

STEP ONE - I opened the photo in Photoshop and created an "Exposure Adjustment Layer."  I then increased the exposure by 3 1/2 f-stops (I told you it was way off), hit Ctrl I on my PC (Command I on the mac) to invert the layer mask, and painted my substantially brighter brother (and I don't mean mentally... or do I?) into the photo.  This is what I had after step one.


STEP TWO - Next I opened my drawing in Lightroom (one of the best programs of all times) and I put a Graduated Filter on the sky, decreased the exposure on the sky, and added some blue saturation.  Here is the photo after Step Two.


STEP THREE - Finally I applied the "Sharpen-Landscapes" preset that comes with Lightroom and I added a subtle vignette to get my final image.


All of this took maybe ten minutes and I think the photo is definately better... but, it would have be a LOT better if I had used "Fill-Flash" to correctly expose my brother "in-camera."  I will explain that technique tomorrow.

I am an early morning blogger, but the family is starting to stumble out of their beds so I am going to wrap this up for the day and enjoy some of this Florida sunshine.

Keep shooting!

Ryan

Friday, November 20, 2009

Who needs Jenny Craig when you've got istockphoto.com?

This is a picture of my sister-in-law's brother, Kenny, and our nephew.  When I showed this picture to him he said, "great picture, but can you shave 40 pounds off me?"


Now... Kenny's got a good sense of humor and I don't think he's going to kick my butt for this, but I wanted to have a little fun, and try out istockphoto.com at the same time.  istockphoto is an online source for royalty free photos that you can purchase at a fairly reasonable. price.  I have heard and read about istockphoto and decided to make a purchase just to see how the whole thing works.  I purchased a picture of a body builder and dropped Kenny's head on it.  Not bad... don't you think?  I definately shaved off the 40 pounds.


As for istockphoto.com... I messed up and accidentally downloaded the body builder image more then once and at different resolutions, which depleted my $20 worth of credits and left me wondering what the heck happened.  It was totally my fault, but I shot an email off to the folks at istockphoto.com and they graciously added the credits back to my account.  It really is easy to make a purchase... now that I have done it once.  I will definately use them as a resource in the future.

COMING UP NEXT WEEK... "Fill-in Flash... the basics"

Have you ever had this happen to you?  I was backpacking with my brother a few years back when we came upon this perfect scene along the trail and we had to take a picture.  I pulled my camera out of my pack and took this shot.


Arghhh! Have you ever done this?  The background scene looks great, but the subject looks like a bad version of the man in black?  Well, there's an easy fix and it rides a horse by the name of "Fill-in Flash!"  It is a really easy technique and it will vastly improve your photos.

You may already have a picture like this that you would like to "fix".  I will show you how you can greatly "improve" this photo in Lightroom and Photoshop.  I say "improve," not "fix" because I believe a photo always looks better in the end if you capture the best exposure possible in your camera.  But... you can make it look pretty darn good, and that's what I will show you. 

Well... that wraps up another week of the Photog Buzz.  Next monday I will be 2,340 miles from where I'm sitting right now, but I plan to be blogging and hope you'll check back in.  Until then...

Keep shooting!

Ryan

Thursday, November 19, 2009

An Old Truck in HDR

I have spent this week fiddling with Photomatix, the HDR program that is preferred by a lot of photographers.  This old truck is parked in an alley about a block from my office and I thought it might make a good HDR subject.  It looks like some kind of old rusted out research vehicle.


Obviously I need a little more practice.  But overall I am pleased with the program and I like the creative aspects of HDR.  As with most anything, all it will take is a little more study and practice and I should have it down... right?

Photomatix is free to try out and it doesn't expire.  You just have to put up with the watermark until you fork out $99 for the program.  I think it's a pretty good deal, but check it out for yourself at http://www.hdrsoft.com/

I'll see you Friday.  Until then, keep shooting!

Ryan

Wednesday, November 18, 2009

Using Photomatix for HDR Photography

Here is an HDR (High Dynamic Range) photo I took of the train located at Victorian Sqare in Sparks, NV.


Everything I have read seems to say that Photomatix is the program of choice for HDR.  I am testing it out as you can tell from the Photomatix watermark that is plopped on the front of the train.  So far it seems to be a great program.  I may have to put in on my Christmas wish list.

This photo was created using a combination of 5 exposures with 1 f stop between each exposure to capture all the shadows and highlights.  It was high noon when I took the photo so shadows were very harsh.  I shot this with my Canon 1D Mark III set to Auto Exposure Bracketing and mounted on a tripod.

Hope everyone is having a great week and looking forward to the holidays as much as I am.

Keep shooting... and think about adding Photomatix to YOUR wish list.

Ryan

Tuesday, November 17, 2009

Balloons Over McCarran

I decided to fiddle around with a photo I took at the Reno Air Balloon Races back in September.  I cropped it into a square which is a format I really like.  Then I added a black and white adjustment layer with a layer mask in Photoshop and painted the balloons back in.  I think it looks kind of cool the way the balloons pop out of the black and white image.


Camera specs: Canon 1D Mark III with a EF70-200mm lens at 70mm; 1/320 sec at f/13.0; ISO 200.

Keep shooting!

Ryan

Monday, November 16, 2009

HDR Photography

This weekend I decided to try some HDR photography.  HDR stands for High Dynamic Range and refers to the difference between the highlights and shadows in a  photo or scene.  Have you ever taken a photo where some parts of the scene are pefectly exposed while other parts are too dark or too light (blown out).  The scene looked great to you but the camera just couldn't capture it.  This is because our eyes can see and adjust for a much broader range of highlights to shadow then our camera can.

HDR is a photographic technique of taking multiple exposures and combining them to create a photo that captures a much wider dynamic range then a camera can do with one single exposure.  I will explain HDR in greater detail in an upcoming post, but this is one of the pictures I took this weekend.  It is a bridge over the Truckee River in Reno.  There  are a couple of different ways you can use HDR.  One is to recreate an image as you saw it... in other words realistic.  The other option is to create a surreal type of image that leans more toward fantasy.  I used a surreal style with this photo.


Here is what the image looked like coming out of my camera as a single exposure.


To create this HDR photo I used Photomatix and Lightroom 2.

That's it for today.  I plan to continue this discussion on HDR in this weeks blogs so check back in if you're interested, or if you just want to see some cool looking pictures.

Keep shooting!

Ryan

Friday, November 13, 2009

Heads in the clouds

I had a little fun with Photoshop and Lightroom last night and came up with this photo of a friend of mine and his daughter.  I really saturated the colors to give it a bit of a surreal look in my opinion. 


I made it by combining this photo...


with this photo that I took from my back porch last night of the clouds over Reno.


It's finally Friday which means we're heading into another fantastic weekend!  Enjoy... and remember, if you're not having fun, you're probably not taking enough pictures.

Keep shooting!

Ryan

Thursday, November 12, 2009

From Ordinary to Awesome

Here is a photo I took of a friend of mine with his son when we were camping this past summer.  I think it is a pretty nice profile shot with the lake in the background.


But here's the shot as it looked coming out of the camera.


So the question is... how did it go from that... to this..


to this... (hey, where did those trees come from?)


and finally... this?


That's a great question!  One I hope to answer for a class of high school students I am planning a presentation for.  Maybe I'll tell you after I tell them.  I'll give you a hint... it involves Photoshop and Lightroom.

Keep Shooting!

Ryan

Wednesday, November 11, 2009

Fast Food Photography

I was reading the photography blog by Roger "Mzungo" Moore this past weekend.  The guy bills himself as a photographer, explorer, adventurer, and mentor.  If you like adventure photography you might his blog.  You can check it out at http://mzungusafaris.wordpress.com/

Roger was talking about the image that comes out of the camera vs. the final image after editing and processing.  He put it this way, "the Before image is the fast food provided by the camera and the After image is cake complete with icing, after editing and processing, and ready to print."

I thought that was a great analogy.  Here's an example.


This is the "Fast Food" shot right out of the camera.  These are 4th graders and their adult chaperones marching up Sand Mountain in the Nevada desert.  Not a bad picture right out of the camera.  I like the composition.


Here is the "Cake" shot.  I added some blue to the sky in Lightroom 2 and removed the yellow utility markers and some of the foreground stones to create a cleaner image.  It's better then the "Fast Food" shot don't you think?

If you want to set yourself apart as a photographer one of the things you should do is learn all you can about the power of post processing in programs like Photoshop and Lightroom.  You will be amazed at the results you can come up with... and so will your friends and/or clients.

I hope you enjoyed todays blog.  Remember... life's short, so take lot's of pictures!

Keep shooting!

Ryan

Tuesday, November 10, 2009

How Can You Compete With This?

I was at my son's soccer game a couple of weeks ago and a guy came up and started talking to me.  Turns out he was a professional photographer and he assumed I was because I was carrying my Canon 1D Mark III with  70-200mm lens.  We got got to rambling about cameras and photogaphy like photog addicts do.  This guy tells me he works for a local photography company that specializes in school and sport photography, a mass production type of setup.  He told me he worked on his own for years but decided it was impossible to compete with the Walmarts of the world... 

Then this add showed up in my mail box today.


This all got me to thinking... why would anyone in their right mind want to be a professional photographer and compete with this?  Look at what you get for $9.95!  That's insane. 

The way I figure it, the bottom line is this, if you want to make it as a professional photographer and not make a living mass producing  photos in the corner of a strip mall you are going to have to set yourself apart... and in a big, big way.  That will take work!  Funny thing, though, the same holds true for just about any profession.

I came across the website of a guy in Louisiana named Kevin Beasley who is doing just that.  I actually saw his site recommended on David Ziser's blog Digital Pro Talk, which I have listed as one of my "Top 10."  David is another awesome photographer making a decent living specializing in wedding photography.

Problem is... Kevin Beasley's stuff is so good that I am going to have to add him as one of my Top 10 picks.  I only pick 10 (hence the name) so I am going to have to give somebody the boot!  But don't just trust me.  Check Mr. Beasley's stuff out for yourself at http://www.kevinbeasley.com/site2/index2.php

That's all I've got for today.  I have to go decide who's getting axed from my Top 10!  Hmmm, I'm gonna have to think about this.

Keep shooting!

Ryan

Monday, November 9, 2009

The Tube Shot

Over the weekend I gave myself an assignment... take some "common" photos, but in a "new and unique" way.  For my first shot I decided to take a picture the family dog.  To make it unique I shot through a rolled up set of plans that I grabbed out of my office.  She is a golden retriever, which is a bird hunting dog, so I thought taking a photo of her through the barrel of my shot gun might look cool.  That didn't work out because the barrel is so dang small.  The rolled plans worked much better.  Here is the result:


I like the circular glow it put around Tahoe.  I decided to convert it to black and white and cranked up the sharpening in Lightroom.  I pushed the sharpen amount all the way to the right (150) and this is what I got.


I think this gave the photo an almost hand drawn look which I really like.

Here is a picture of me taking the photo.  What an awesome model Tahoe is... and cheap too!  She agreed to work for a handful of raunchy smelling dog treats. 


I shot aiming down towards the ground because I wanted the grass to serve as a simple backdrop.

For those who are interested, my camera specs were as follows: Canon 1D Mark III with an EF24-70mm lens at 25mm; 1/100 sec @ f/5.6; ISO 400.

Keep shooting!

Ryan

Friday, November 6, 2009

Gordon's Photo Service in Reno Rocks!

Last night we attended the end of season party for my son's SYFL football team.  The team mom had this photo mounted and framed for the six coaches.  I took this picture at the end of our last game in Quicy, CA.


I was really impressed with how great the prints looked.  Sometimes the prints I have had done at local printers turn out like crap... for lack of a better term.  When I asked her where she had the prints made she told me Gordon's Photo Service in Reno. 

I have bought camera equipment and supplies from Gordon's, but for some reason I never thought about getting prints made there.  Based on the quality I saw last night, though, I think I'm going to start.

If you have a photo and you want a quality print I suggest you give Gordon's a try.  I have included this link to their store http://gordonsphotoservice.com/ so you can check em' out for yourself. 

It's Friday and I'm looking forward to the weekend!  Have a great one and I'll see you back here on Monday.

Keep shooting!

Ryan

Thursday, November 5, 2009

Looking for a New Camera?

Due to my enthusiasm for photography people often tell me they need a new camera and ask me what I would recommend.  A friend of mine showed me this article by Kim Komando that provides some interesting information on cameras in the "under" $300 range.  With Christmas just around the corner I thought I would pass along the link... just in case anyone is interested.

The Kim Komando Show

Keep shooting!

Ryan

Monday, November 2, 2009

Sports Action Portfolio


Fun with Panoramas

If you haven't tried to put together a panorama (multiple images stitched together to create an extreme wide angle shot) in Photoshop (I am using version CS3) you don't know what you're missing.  It is so easy and the final result is really impressive. 

This weekend I took three photos of the Pony Express Station ruins out in the Nevada desert and I combined them using Photoshop's "Photomerge" tool.  You simply choose two or more photos to merge into a panorama, run fill up your coffee, and by the time you return... Photoshop has nice panorama sitting there waiting for you!  How cool it that!

These are the three photos along with the final result.  It was a cold grey day so I "blued" up the sky a bit in Lightroom.  All in all it probably took me less then five minutes... but don't tell anyone!


and here is the end result!


Give it a try.

Ryan