Welcome to the Photog Buzz

Follow along as Ryan shares the success and failures of a his start-up photography studio.
You just might get inspired!

Saturday, December 26, 2009

Lava Lamps... they just never get old!

Our 17 year old daughter received a lava lamp for Christmas from her 19 year old sister.  You know... that is just one gift that never gets old, and they make for some fun photos.  I photographed this image last night after we got home from dinner.


I cropped the image to show just the melting, stretching, goo inside the lamp (I'm not sure how else to describe it).  It makes for an interesting, different image.

Camera specs: Canon 1D Mark III with EF 24-70mm lens at 34mm; 1/30 sec at f/5.6; ISO 400; no flash; hand held the camera.

Here's one more image...

It is always a fun photo exercise to try and look at the usual in an unusual way.  Here is a glass of Merlot looking straight down into the glass.


Have a great day, get inspired, and go take some photos!

Ryan

Friday, December 25, 2009

Finally... I've got my hands on the Canon G11 "Backpacker" Camera


For Christmas I got the Canon G11 "Backpacker" as a gift from my wife.  I know, I know... it's not called the "Backpacker."  It's called the Power Shot G11.  I made up the "Backpacker" term, but I think it is just a matter of time before the term catches on! 

You see, the G11 is kind of like a point-and-shoot on steriods... and I think it might be just the thing to take with me with I go backpacking.  This little baby offers the controls of a DSLR.  It even shoots RAW images.  But it is much smaller and much lighter then a DSLR and will fit nice and neat in the pocket of my backpack.

I have a 1D Mark III which is just too big and bulky to lug with me into the deep backwoods of Yosemite.  I have a 20D that I took with me last summer but it is a little heavy.  I think the G11 is going to work great.  I am going to read through the manual and spend the next week playing with the camera.  I will let you know what I think, good, bad, or ugly.  If it passes the mustard, so to speak, it is going to become my official backpacking camera.  Look for my review after the first of the year.

I hope everyone had a great Christmas!  Our office is closed until January 4th so I'm taking the family and heading to eastern Washington to celebrate New Years with my two brothers and their families.  The lap top is going with me so I'll be bloggin' from the road.

Keep shooting!

Ryan

Tuesday, December 22, 2009

Wedding Photography Gone Bad!

You know... if your wedding photographer comes cheap, or for free, there is probably very good reason!  My wife and I have been married twenty years and if you ask her if there is anything she wishes she had done different for our wedding she says, "I wish we had hired a good photographer."  Here are a few of our wedding photos so you can see for yourself why she holds that opinion.


We can't really blame our hair on the photographer.  Hey, it was the 80's man!


  Nice photo... if you're in the witness protection program!


Need I say more?

It is ironic, and perhaps no coincidence, that I would became such an avid photographer.  Perhaps to help others avoid such blunders in the future.

Here's a video/news report about another couple who appear to have "cut costs" when it came time to hire their wedding photographer.
Watch this at My Fox Boston

Enjoy your Tuesday and keep shooting!

Ryan

Monday, December 21, 2009

Getting creative with the shutter speed

I took this photo of the sunrise yesterday (Sunday) morning.  I felt like playing around so I adjusted the coloring in Lightroom and came up with this image.  It kind of has that "Lion King" feel to it don't you think?  The sky was hazy over Reno this particular morning, but the sunrise created a thin band of dramatic color just above the ridgeline of the mountains.  I cropped the image down to display just that line of color.


Camera Specs for the shot were: Canon 1D Mark III with EF24-70mm lens at 68mm; 1/8 sec @ f/8.0; ISO 100.  I took the photo at 7:14AM.

Here is the photo I took a minute before, at 7:13AM.


I decided to slow the shutter speed down a little and wave my camera around to see what I could come up with.  I thought this image was kind of interesting.  It looks more like a forest fire then a sunrise.  The orange "flame" is the same orange that makes up the first image.  If you look closely you can see the trees (giant sequoias) through the haze.  I cropped all that haze out of the first image.

My camera specs for this shot were: Canon 1D Mark III with EF24-70mm lens at 68mm; 1 sec @ f/11.0; ISO 100.

A Video by David Ziser...

If you use Lightroom in your photography workflow, here's a video by David Ziser you might like.  He demonstrates how to "paint" with light to create a dynamite image.

It's only Monday, but if you're like me you're staring down the barrel of a short work week.  We close our business down between Christmas and New Years and I'm really looking forward to it.  It is a great time to hang out with family and friends.  Keep shooting!

Ryan


Friday, December 18, 2009

Creating your website

Creating your website...

Yesterday I posted that my photography website was almost ready and I told you that I had chosen to use SiteWelder to create and host my site.  After I posted that blog, though, I realized you might like to know what other website companies I looked into.  They are:

SiteWelder
LiveBooks
Marathon Press

I know that there are many more, but this will at least give you a good start if you are interested in creating a website for your business... pretty much a "must do" if you want to truly succeed.

I own another business and we built that website inhouse.  It turned out pretty nice... but, boy, did it take a while.  It would have been much faster and cheaper to use one of the above-mentioned providers.  The end result would have been pretty much the same... a professional looking website for clients (and potential clients) to check out when they are contemplating hiring us.  A big drawback is that I depend on someone else to update it (remember, I don't know too much about HTML).  Needless to say, it does not get updated as often as I would like.

Image of the day...


Can you guess what it is?  Post your answer to my Facebook page.  Good luck!

Ryan

Thursday, December 17, 2009

The website is almost ready... and some other stuff

Website Update...

My photography website is almost ready!  Nowadays it is pretty easy to get a quality website going without spending a ton of money.  I looked at several website companies before finally deciding to go with SiteWelder.  I orginally learned of SiteWelder because it was highly recommended by the late, great photographer, Monte Zuker

I love the fact that you can add your logo to your website and make other changes with ease.  You have complete control .  I know very little about HTML (the written code that makes your website look like, well... your website), but it is very important that I be able to update the website so that it stays current.  If I have to count on someone else to make the changes, chances are it won't happen too often.  I was considering a different website company because they were a little cheaper... until I realized all the "extra charges," like $45 min. to change your font (are you crazy!), $800 for branding, etc., etc.

I hope to have the photography website up and running by the end of the year.

I Can't Wait for Christmas...

My wife hates buying Christmas gifts for me so she told me to just order whatever I want from B&H Photo (pretty much everything I want comes from B&H) and she'll wrap it when it gets here.  Works for me!

I placed my order today for the Canon PowerShot G11 digital camera and a Spyder 3 Elite Display Calibration System.  I have been shooting Canon cameras for many years.  I have a Canon 1D Mark III and a Canon 20D, both DSLR's, but I am looking for a small camera that I can carry with me where ever I go.  You know what they say... the BEST camera is the one you have with you.  The G11 is a 10 meg point-and-shoot that can shoot in RAW format and has a hot shoe mount.  The guy from Strobist just got one and raves about it.  I'll let you know what I think after I have had a chance to play around with it.  I'll also let you know what I think about the Spyder 3 Elite.

Image of the day...

Here's a photo I took recently.


Be the first to tell me what it is and I will send you a Starbucks card for a free latte.  Leave your answer here as a comment, or on my Facebook page.  Be specific... good luck!  If no one guesses what it is I'll tell you next Monday.

Ryan 

Wednesday, December 16, 2009

Learning... it may be cheaper then you think


Only 16 days until start of the "Sunrise 2010 Exhibit."

Although I like this photo, it is missing the 3D effect that you can achieve with directional lighting.  In otherwords, I think think photo is a little flat.  Check out the photo in yesterday's blog to see if you don't agree.  To achieve directional lighting you need to get your flash off of your camera.  Move it to a 45 deg angle from your subject and see the improvement.  Raising it up above your subject a few feet to create what is called "loop" lighting.  I will discuss loop lighting in an upcoming blog.  To acheive directional lighting with natural light you need to study where the light is coming from and adjust your position or camera angle accordingly.

One more thing...

It has never been easier to learn photography, or whatever else you may be interested in.  The web has a wealth of information.  A lot of it is free.  But even the stuff that isn't free is very affordable.

Case in point... every time I receive the Extended Studies catalog in the mail from our local university I feel compelled to write a plug for Kelby Training, without which, I would be nowhere close to where I am today as a photographer.

I flipped open the catalog that I received in the mail today and saw that I can take a beginning Photoshop class for $349.  What amazes me, though, is that I can take as many online courses as I want over an entire year for only $199 through Kelby Training, and these are GREAT courses folks!  They are taught by top professionals in our field.  How cool is that!  You can find a class on just about anything photography related... wedding photography, Photoshop, web design, Lightroom... it goes on and on.  Another benefit is that you can take the same course over and over, if you're like me and it takes a few times to sink in.

That's enough of my sales pitch.  I am not tied to Kelby Training in any way, but you can probably tell that I think it is an awesome resource.  Check it out for yourself.

That's it for today.  Keep shooting!

Ryan 

Tuesday, December 15, 2009

Using directional light to create image depth


I have been shooting the sunrise from my deck for the past few weeks.  For this image I turned the camera towards this snow covered honey locust tree in our backyard.  The reflection of the morning light through the branches gives the photo a great 3-dimensional quality.  Directional lighting on the giant sequoias adds additional depth.

I am beginning to understand why David Ziser http://digitalprotalk.blogspot.com/ is such a big proponent of directional lighting.  I have found that the images I really like all have directional lighting (flash or natural) which creates shadows and depth, making the  image come alive.

This photo was taken just after sunrise at 7:31AM.  Camera specs were: Canon 1D Mark III with EF24-70mm lens at 40mm; 1/125 sec @ f/8.0; ISO 100.  I focused manually, using a tripod and cable release to eliminate camera shake.  A small amount of post-processing was done in Lightroom 2.0.  It is amazing how much better your photos look in the lighting that occurs in the one or two hours after sunrise.

One more thing...

Here's a link to an interesting site on photography with some great tips on how to take a better picture.  It's called lifehacker.  Check it out at http://lifehacker.com/5424825/most-popular-photography-hacks-of-2009

I hope your week is going well and the hustle and bustle of the holidays isn't getting you too frazzled.  Keep shooting!

Ryan

Monday, December 14, 2009

A Storm is Coming

Sitting in my home office writing these early morning blogs I get to watch some spectacular sunrises .  So a few weeks ago I decided to grab my camera and photograph them.  I took this photo last Saturday morning a few hours before another snow storm rolled into the Reno area.  Clouds and sunlight make for some splendid imagery. 


I like to process my images in Lightroom 2.0.  I usually spend no more then few minutes in post-processing.  I always shoot in RAW which allows me greater flexibility with my exposure and white balance settings, I use a tripod, keep my ISO as low as I can, and focus on the sky manually.

My camera specs for this shot were: Canon 1D Mark III with EF24-70mm at 40mm; 1/100 @ f/8.0; ISO 100

Tuesday, December 8, 2009

Shooting in Snow

I woke up yesterday morning and this was the view out my kitchen widow.


We got about a foot of snow yesterday and I spent most of my day shoveling the driveway.  Needless to say, when I was thinking about what to post for today's blog I had  snow on my mind.  So I figured, write something about shooting in the snow.

When you shoot in snowy, cold conditions there are a couple of things to remember.  First, batteries drain very quickly in cold weather, so take extra batteries and keep them warm by carrying them in an inside pocket close to your body.  The second thing to remember is that when your camera tries to read all that white it has a tendancy to underexpose.  Bump up your exposure at least 1 stop.  For this picture out my window I increased the exposure almost 1 1/2 stops.  Play around with your camera and you'll figure out what works best for you.

You may also find that your LCD screen doesn't always work in very cold conditions.

Long underwear and a good pair of gloves ain't a bad idea either.

Keep shooting!

Ryan

Monday, December 7, 2009

What a difference a day makes

I woke up to 10 inches of snow and still falling.  It is amazing how many different photos you can get of the same view, especially when you include the sky... which is constantly changing.  Starting January 1, 2009 I am going to attempt to photograph the sunrise everyday for one year.  In the mean time I have been getting up and shooting the sunrise from my back deck just to fiddle with camera setttings, etc.  Here is the photo I took at 7:00 AM yesterday, and the one I took today at the same time.


Dec 6, 2009 - Reno, NV
Canon 1D Mark III with EF24-70mm lens at 46mm; 1/400 @ f/8.0; ISO 100


Dec 7, 2009 - Reno, NV
Canon 1D Mark III with EF24-70mm lens at 48mm; 1/60 @ f/8.0; ISO 1600

Enjoy your Monday... and keep shooting!

Ryan

Friday, December 4, 2009

Two of my favorite things: cotton fields and Lightroom

My wife is from north Florida and whenever we go down for a visit I love seeing the cotton fields in bloom.  I think that is about as southern a thing as there is.  I took a quick shot of this field from my brother-in-laws car as we were whizzing by at about 60 mph.  I thought I would show a quick before and after shot to demonstrate, once again, why I am such a fan of Adobe's Lightroom.  I spent literally one minute making a few adjustments to improve the photo.  It is just a quick shot out the window of a speeding car so it's not perfect... but I like it.


Before - the "fast food" shot

After - with a little help from Lightroom

That's it for me.  See you on monday!

Ryan

Thursday, December 3, 2009

Just in case you missed it... yesterdays sunrise

Sunrise can make for some beautiful pictures.  Unfortunately you have to get up early to take them.  Yesterday's sunrise in Reno was at 7:02AM according to the Reno Gazette Journal, an acceptable hour, so I decided to take some shots and see what I got.  From our backyard balcony you can see planes leaving Reno Tahoe International Airport and heading south.  If you look closely you can see an early moring flight leaving just before the sun popped up from behind the mountains (no it is not sensor dust, it is a plane!).


My camera specs were: Canon 1D Mark III with EF24-70mm lens at 54mm; shutter speed 1/30 @ f/8.0; ISO 800.  I had my camera on a tripod and focused manually.  I used Lightroom to bring out the colors and artistry of the image.

Tuesday, December 1, 2009

Photog Buzz Library

I read a lot of photography books.  Some are really great... others are not.  I am only going to tell about the books on my bookshelf that I think are really good and would recommend to a friend.  I will be adding more books to this list as time allows.  To start things off I figured I would tell you about the most worn out book(s) on my shelf.  These are the three books and they are a best-selling series.


If I could only buy one book about digital photography it would be "The Digital Photography Book, Volume 1, 2, and 3," by Scott Kelby.  I know... thats actually three books, but you can buy them all together in a slip case.  If you are an amateur wanting to take better photos, or a pro looking for some good reference books, these are great!

Just Warming Up (Sunrises of Dec 2009)

These photos are a warm up for the start of my "Looking East: Sunrises of 2010" project on January 1, 2010.  I plan to take photos of the sunrise, where ever I may be at the time, for one year.  This month, however, I am taking these early morning shots all from the same spot... my back deck.  It is interesting (to me anyway) to see how many different images I can create shooting from the same exact location.


#1 December 2, 2009; 702AM; Reno, NV


#2 December 2, 2009; 702AM; Reno, NV


#3 December 4, 2009; 704AM; Reno, NV


#4 December 6, 2009; 7:23 AM; Reno, NV


#5 December 7, 2009; 7:07 AM; Reno, NV


#6 December 12, 2009; 7:28AM; Reno, NV


#7 December 13, 2009; 7:31AM; Reno, NV

Clothing tip for group photos

What your subjects wear can greatly effect the overall quality of an image.  Not everyone is going to listen to you, but strongly encourage your clients to coordinate their clothing for group shots.  It is a pretty simple thing to do and your image WILL look a lot better.  It is also more likely to endure the test of time.  Simple, solid colors are best.  Take a look at some portraits from the 1970's if you don't believe me.  Here is a picture of my wife (second from the right) with her dad and siblings.


They are all wearing the same color shirts, and because the shirts are darker your attention is immediately drawn to their faces... which is what a portrait is all about.  They all wore long sleeves which is another plus.  Your eye is naturally drawn to the brighter parts of the image.  You can see how Kelly's forearms distract a little from the faces.  If everyone was in short sleeves you can imagine how distracting it would be and that the image would lose some of it's quality.

The ground sloped to the right and it might have looked better if I had had them reverse order, so that the taller two were on the downhill side of the frame.  That's something I can place in the "maybe next time" file that I keep stored in my head.  But then again, I kind of like the way the image composition slopes from left to right.  Switching their order may have evened out their heights and made the composition a little boring.

It was a sunny day in Florida.  To get rid of the strong shadows from the sun I had them move into the shade.  Simple... but effective.

Keep shooting!

Ryan

Monday, November 30, 2009

Shooting in harsh sunlight

I was  visiting the in-laws in Florida for Thanksgiving so it has been a few days since I posted a blog.  I took all my camera gear and we took some family photos at my father-in-laws house.  I especially like this one of the grandkids.


Piling them all into a boat made for a great informal pose.  The sun was very bright and I have discovered that my personal favorite lighting in this situation is to have the sun directly behind the subjects so the sun doesn't cast shadows on their faces, and to lighten them up with a little fill flash.  I have tried having the sun behind me and I think it makes the light unflattering.  I have tried having the sun off to the side of my subjects, but have found the shadows to be too harsh even with some fill flash.

Keep shooting!

Ryan


Tuesday, November 24, 2009

Take control of your TTL flash photography

One of the toughest things for me to gain control of has been my TTL (through the lens) flash.  It always seemed to be hit or miss when it came to the right exposure.  It didn't matter what setting I used on my camera: program mode, apurture priority, manual...  The results always seemed to vary.  Sometimes the shots would turn out great, but a lot of times they didn't.

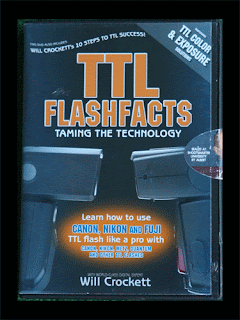
For today's blog I thought I'd let you in on a little secret.  Will Crocket's shootsmarter.com is listed as one of my "Top 10" photography sites and there is a good reason for that.  Shootsmarter.com provides a huge amount of free information that will make you a better photographer.  One of the items they have for sale that I would strongly recommend is their "TTL Flashfacts" video.  Here is what the copy I have looks like.


If you want to finally understand how to get the most out of yourTTL flash then check out this video.  I have watched it over and over and I am finally starting to understand this TTL stuff.  You may not have to watch it as many times as I have, but what can I say... I'm a little slow.

Keep shooting!

Ryan

Monday, November 23, 2009

Did You Forget the Fill-Flash?

Well, I made it to Florida and I'm hanging out with my wife's family this week, enjoying the warmer weather and looking forward to eating way too much this Thursday.  Last Friday I showed you this picture that I took of my brother when we were backpacking in Washington.


The camera exposed correctly for the background scenery.  The problem is that my brother looks like he's in the witness protection program.  I should have used fill-flash to correctly expose my brother and I am going to explain how you do that later this week.  But what can I say?  I screwed up this photo, so why not take this opportunity to show you how it can be salvaged using Photoshop and Lightroom. 

The dynamic range of the photo (the difference between the shadows and highlights) and the exposure on my brother was sooooo far off that image noise (grainyness) is going to be a huge problem.  If you look closely you can see Mnt. Rainier (I believe it was Mnt. Rainier) in the background.  Mnt. Rainier was over exposed to make matters worse.  I really like this photo though, so here is what I did to make it an image worth keeping. 

STEP ONE - I opened the photo in Photoshop and created an "Exposure Adjustment Layer."  I then increased the exposure by 3 1/2 f-stops (I told you it was way off), hit Ctrl I on my PC (Command I on the mac) to invert the layer mask, and painted my substantially brighter brother (and I don't mean mentally... or do I?) into the photo.  This is what I had after step one.


STEP TWO - Next I opened my drawing in Lightroom (one of the best programs of all times) and I put a Graduated Filter on the sky, decreased the exposure on the sky, and added some blue saturation.  Here is the photo after Step Two.


STEP THREE - Finally I applied the "Sharpen-Landscapes" preset that comes with Lightroom and I added a subtle vignette to get my final image.


All of this took maybe ten minutes and I think the photo is definately better... but, it would have be a LOT better if I had used "Fill-Flash" to correctly expose my brother "in-camera."  I will explain that technique tomorrow.

I am an early morning blogger, but the family is starting to stumble out of their beds so I am going to wrap this up for the day and enjoy some of this Florida sunshine.

Keep shooting!

Ryan

Friday, November 20, 2009

Who needs Jenny Craig when you've got istockphoto.com?

This is a picture of my sister-in-law's brother, Kenny, and our nephew.  When I showed this picture to him he said, "great picture, but can you shave 40 pounds off me?"


Now... Kenny's got a good sense of humor and I don't think he's going to kick my butt for this, but I wanted to have a little fun, and try out istockphoto.com at the same time.  istockphoto is an online source for royalty free photos that you can purchase at a fairly reasonable. price.  I have heard and read about istockphoto and decided to make a purchase just to see how the whole thing works.  I purchased a picture of a body builder and dropped Kenny's head on it.  Not bad... don't you think?  I definately shaved off the 40 pounds.


As for istockphoto.com... I messed up and accidentally downloaded the body builder image more then once and at different resolutions, which depleted my $20 worth of credits and left me wondering what the heck happened.  It was totally my fault, but I shot an email off to the folks at istockphoto.com and they graciously added the credits back to my account.  It really is easy to make a purchase... now that I have done it once.  I will definately use them as a resource in the future.

COMING UP NEXT WEEK... "Fill-in Flash... the basics"

Have you ever had this happen to you?  I was backpacking with my brother a few years back when we came upon this perfect scene along the trail and we had to take a picture.  I pulled my camera out of my pack and took this shot.


Arghhh! Have you ever done this?  The background scene looks great, but the subject looks like a bad version of the man in black?  Well, there's an easy fix and it rides a horse by the name of "Fill-in Flash!"  It is a really easy technique and it will vastly improve your photos.

You may already have a picture like this that you would like to "fix".  I will show you how you can greatly "improve" this photo in Lightroom and Photoshop.  I say "improve," not "fix" because I believe a photo always looks better in the end if you capture the best exposure possible in your camera.  But... you can make it look pretty darn good, and that's what I will show you. 

Well... that wraps up another week of the Photog Buzz.  Next monday I will be 2,340 miles from where I'm sitting right now, but I plan to be blogging and hope you'll check back in.  Until then...

Keep shooting!

Ryan

Thursday, November 19, 2009

An Old Truck in HDR

I have spent this week fiddling with Photomatix, the HDR program that is preferred by a lot of photographers.  This old truck is parked in an alley about a block from my office and I thought it might make a good HDR subject.  It looks like some kind of old rusted out research vehicle.


Obviously I need a little more practice.  But overall I am pleased with the program and I like the creative aspects of HDR.  As with most anything, all it will take is a little more study and practice and I should have it down... right?

Photomatix is free to try out and it doesn't expire.  You just have to put up with the watermark until you fork out $99 for the program.  I think it's a pretty good deal, but check it out for yourself at http://www.hdrsoft.com/

I'll see you Friday.  Until then, keep shooting!

Ryan

Wednesday, November 18, 2009

Using Photomatix for HDR Photography

Here is an HDR (High Dynamic Range) photo I took of the train located at Victorian Sqare in Sparks, NV.


Everything I have read seems to say that Photomatix is the program of choice for HDR.  I am testing it out as you can tell from the Photomatix watermark that is plopped on the front of the train.  So far it seems to be a great program.  I may have to put in on my Christmas wish list.

This photo was created using a combination of 5 exposures with 1 f stop between each exposure to capture all the shadows and highlights.  It was high noon when I took the photo so shadows were very harsh.  I shot this with my Canon 1D Mark III set to Auto Exposure Bracketing and mounted on a tripod.

Hope everyone is having a great week and looking forward to the holidays as much as I am.

Keep shooting... and think about adding Photomatix to YOUR wish list.

Ryan

Tuesday, November 17, 2009

Balloons Over McCarran

I decided to fiddle around with a photo I took at the Reno Air Balloon Races back in September.  I cropped it into a square which is a format I really like.  Then I added a black and white adjustment layer with a layer mask in Photoshop and painted the balloons back in.  I think it looks kind of cool the way the balloons pop out of the black and white image.


Camera specs: Canon 1D Mark III with a EF70-200mm lens at 70mm; 1/320 sec at f/13.0; ISO 200.

Keep shooting!

Ryan

Monday, November 16, 2009

HDR Photography

This weekend I decided to try some HDR photography.  HDR stands for High Dynamic Range and refers to the difference between the highlights and shadows in a  photo or scene.  Have you ever taken a photo where some parts of the scene are pefectly exposed while other parts are too dark or too light (blown out).  The scene looked great to you but the camera just couldn't capture it.  This is because our eyes can see and adjust for a much broader range of highlights to shadow then our camera can.

HDR is a photographic technique of taking multiple exposures and combining them to create a photo that captures a much wider dynamic range then a camera can do with one single exposure.  I will explain HDR in greater detail in an upcoming post, but this is one of the pictures I took this weekend.  It is a bridge over the Truckee River in Reno.  There  are a couple of different ways you can use HDR.  One is to recreate an image as you saw it... in other words realistic.  The other option is to create a surreal type of image that leans more toward fantasy.  I used a surreal style with this photo.


Here is what the image looked like coming out of my camera as a single exposure.


To create this HDR photo I used Photomatix and Lightroom 2.

That's it for today.  I plan to continue this discussion on HDR in this weeks blogs so check back in if you're interested, or if you just want to see some cool looking pictures.

Keep shooting!

Ryan

Friday, November 13, 2009

Heads in the clouds

I had a little fun with Photoshop and Lightroom last night and came up with this photo of a friend of mine and his daughter.  I really saturated the colors to give it a bit of a surreal look in my opinion. 


I made it by combining this photo...


with this photo that I took from my back porch last night of the clouds over Reno.


It's finally Friday which means we're heading into another fantastic weekend!  Enjoy... and remember, if you're not having fun, you're probably not taking enough pictures.

Keep shooting!

Ryan

Thursday, November 12, 2009

From Ordinary to Awesome

Here is a photo I took of a friend of mine with his son when we were camping this past summer.  I think it is a pretty nice profile shot with the lake in the background.


But here's the shot as it looked coming out of the camera.


So the question is... how did it go from that... to this..


to this... (hey, where did those trees come from?)


and finally... this?


That's a great question!  One I hope to answer for a class of high school students I am planning a presentation for.  Maybe I'll tell you after I tell them.  I'll give you a hint... it involves Photoshop and Lightroom.

Keep Shooting!

Ryan